
craftsman air compressor manual
Craftsman Air Compressor Manual: A Comprehensive Guide
This manual provides essential guidance for Craftsman air compressor models‚ including assembly‚ operation‚ maintenance‚ and repair – specifically referencing model 919.176850.
Understanding Your Craftsman Air Compressor
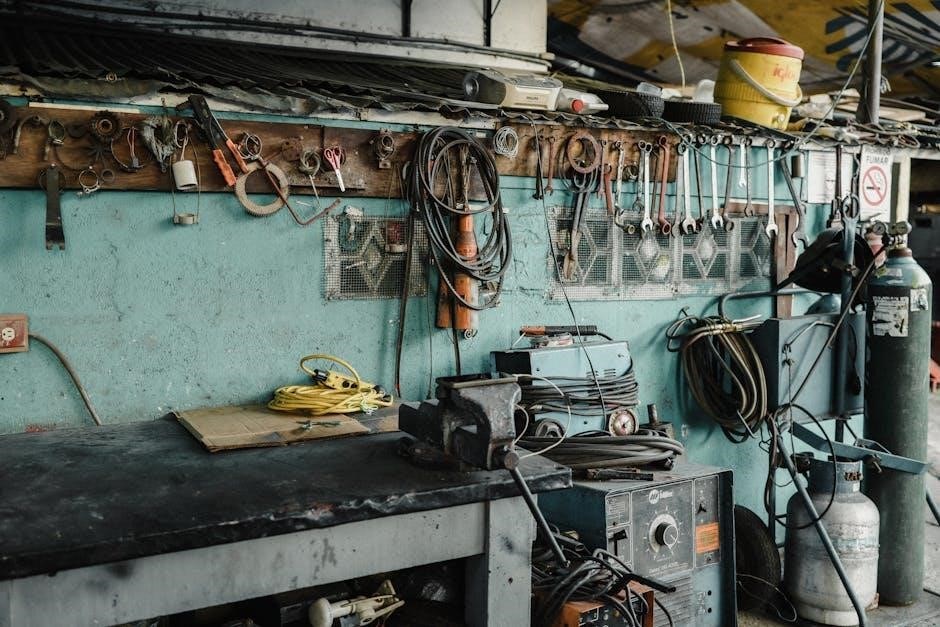
Craftsman air compressors are designed for a variety of tasks‚ from inflating tires to powering pneumatic tools. This guide covers models like the 6-gallon 150 PSI portable kit (919.176850) and the 0.5-gallon wall mount compressor. Familiarize yourself with the compressor’s components‚ including the tank‚ motor‚ pump‚ and controls‚ to ensure safe and efficient operation. Understanding these elements is crucial for proper maintenance and troubleshooting.
Safety Guidelines & Precautions
Always read the safety guidelines before operating your Craftsman air compressor (model 919.176850). Disconnect power before servicing. Wear safety glasses and ear protection. Never exceed the maximum PSI. Ensure adequate ventilation. Avoid flammable substances near the compressor. Inspect hoses and fittings regularly for damage. Proper grounding is essential to prevent electrical shock; follow all instructions carefully;

Model Numbers & Identification
Identifying your Craftsman air compressor model is crucial for parts and support. Look for the model number‚ such as 919.176850‚ on the compressor’s data plate. This plate typically displays key specifications. Understanding the model number allows for accurate parts lookup and accessing the correct manual for your specific 6-gallon or 80-gallon unit.
Identifying Common Craftsman Compressor Models (e.g.‚ 919.176850)
Common Craftsman models include the 6 Gal. 150 PSI Portable Electric Air Compressor Kit (919.176850) and the 0.5 Gal. 125 PSI Wall Mount Electric Air Compressor. Identifying these models involves locating the data plate‚ usually on the tank or motor housing. Note the complete model number for accurate parts ordering and accessing specific documentation.
Decoding Model Numbers for Parts Lookup
Craftsman model numbers‚ like 919.176850‚ are crucial for precise parts identification. These numbers categorize compressor specifications and components. Utilize the full model number when searching online parts diagrams or contacting customer support. Accurate decoding ensures you order the correct replacement parts‚ preventing compatibility issues and ensuring proper compressor function and longevity.
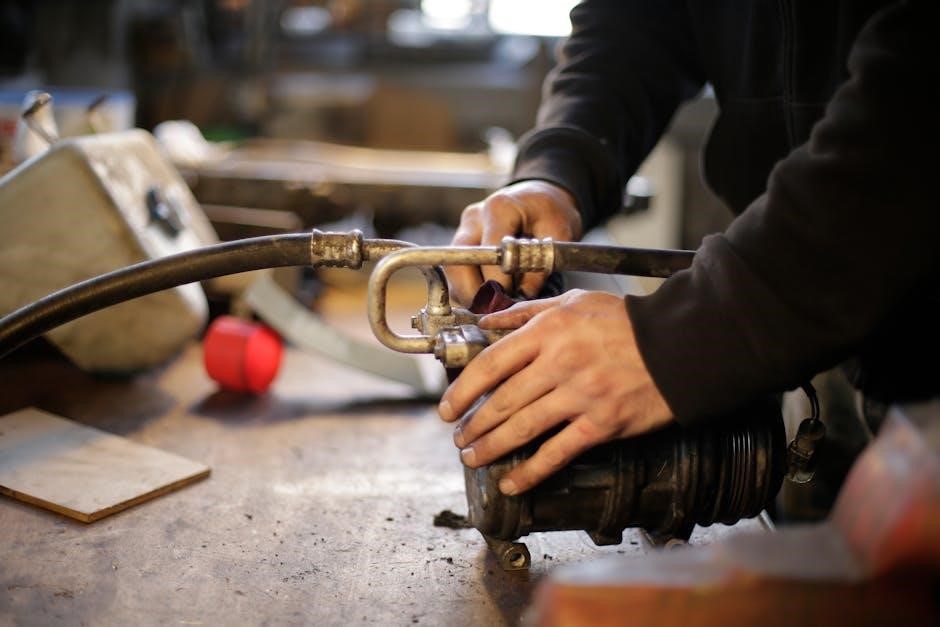
Assembly Instructions
Before operation‚ carefully assemble your Craftsman air compressor. Begin with a thorough component checklist‚ verifying all parts are present. Securely connect the tank‚ ensuring a leak-proof seal. Install the air hose‚ utilizing appropriate fittings. Refer to the detailed diagrams included with your specific model – such as the 6 Gal. 150 PSI kit – for visual guidance throughout the assembly process.
Initial Setup & Component Checklist
Prior to first use‚ unpack and inventory all components. Confirm the presence of the compressor unit‚ tank‚ air hose‚ fittings‚ and any included accessories – like those in the 13-Piece kit. Inspect for shipping damage. Ensure the power cord is intact. Verify the pressure gauge and safety valve are securely attached. Refer to your model’s documentation (e.g.‚ 919.176850) for a complete parts list.
Tank Connection & Air Hose Installation
Carefully connect the air tank to the compressor unit‚ ensuring a tight and secure fit – often requiring a threaded connection. Attach the air hose to the compressor’s outlet fitting‚ verifying compatibility with your air tools. Use Teflon tape on threaded connections to prevent leaks. Inspect the hose for kinks or damage before pressurizing the system. Always follow the manual’s guidance for your specific model‚ like 919.176850.
Operation Procedures
Before operation‚ ensure the compressor is on a stable‚ level surface. Connect the air hose and tool‚ then power on the unit. Allow the compressor to build pressure to the desired PSI setting. Regularly monitor the pressure gauge during use. Refer to your tool’s manual for appropriate PSI requirements. Model 919.176850 requires careful monitoring during initial startup and pressure adjustments.
Powering On & Initial Startup
Prior to the first use‚ inspect all connections for tightness. Ensure the power cord is properly grounded and connected to a compatible outlet. Turn the power switch to the ‘ON’ position. Allow the compressor to run until it reaches its maximum PSI (150 PSI for some models like 919.176850). Listen for any unusual noises during startup‚ indicating potential issues.
Adjusting Pressure Settings (PSI)
Locate the regulator knob on your Craftsman compressor. Turning it clockwise increases the PSI‚ while counterclockwise decreases it. Monitor the pressure gauge while adjusting to achieve the desired level for your air tool. Never exceed the maximum PSI rating of your tool or the compressor (e.g.‚ 150 PSI for model 919.176850).
Using Air Tools with Your Compressor
Before connecting any air tool‚ ensure the compressor is running and has reached the required PSI. Use appropriate air hoses and fittings for a secure connection. Always disconnect the tool from the compressor before making adjustments or performing maintenance. Refer to your air tool’s manual for specific PSI requirements.
Maintenance Schedule

Regular maintenance is crucial for optimal performance and longevity. Implement daily checks for leaks and proper operation. Drain the tank weekly to prevent corrosion. Monthly‚ clean or replace the air filter and inspect hoses for wear. Adhering to this schedule ensures your Craftsman compressor remains reliable and efficient‚ avoiding costly repairs.
Daily Maintenance Checks
Before each use‚ visually inspect the air compressor for any obvious damage. Check air hoses and fittings for leaks‚ ensuring secure connections. Listen for unusual noises during operation‚ which could indicate a problem. Confirm the pressure gauge reads accurately and the unit powers on smoothly. These quick checks promote safe and efficient use.
Weekly Drain Tank Procedure
To prevent rust and maintain optimal performance‚ drain the tank weekly. First‚ disconnect the power supply. Locate the drain valve at the tank’s bottom and open it to release accumulated moisture. Allow the tank to fully drain‚ then close the valve securely. This simple step extends the compressor’s lifespan and ensures clean air delivery.
Monthly Filter Cleaning & Inspection
Regular filter maintenance is crucial for air quality and compressor efficiency. Each month‚ disconnect power and remove the air filter. Clean it thoroughly with mild soap and water‚ ensuring it’s completely dry before reinstalling. Inspect for damage; replace if torn or excessively dirty. A clean filter prevents debris from entering the system.
Troubleshooting Common Issues
This section addresses frequent problems encountered with Craftsman air compressors. Common issues include failure to start‚ low air pressure‚ and air leaks. Always disconnect power before inspecting. Check the power cord‚ breaker‚ and pressure switch. For leaks‚ use soapy water to identify the source. Addressing these promptly ensures optimal performance.
Compressor Won’t Start
If your Craftsman compressor fails to start‚ first verify the power supply. Check the outlet‚ circuit breaker‚ and power cord for damage. Ensure the on/off switch is engaged. A tripped thermal overload protector might also be the cause; allow it to cool before restarting. Inspect the pressure switch functionality as well.
Low Air Pressure Problems
Experiencing low air pressure? First‚ confirm the compressor isn’t overloaded with too many tools running simultaneously. Check for air leaks in hoses‚ fittings‚ and the tank itself. A clogged air filter restricts airflow‚ reducing pressure. Ensure the pressure switch is set to the desired PSI and functioning correctly; a faulty switch needs replacement.
Air Leaks & How to Find Them
Air leaks diminish compressor efficiency. Begin by listening for hissing sounds around fittings‚ hoses‚ and the tank. Apply a soapy water solution to suspected areas; bubbles indicate leaks. Inspect the drain valve and pressure switch. Tighten connections or replace worn parts like hoses and seals. A persistent leak may require professional attention.
Repair Procedures
Addressing issues promptly extends your compressor’s life. Common repairs include replacing the air filter for optimal airflow‚ a belt replacement if it’s worn or cracked‚ and‚ for oil-lubricated models‚ a pump oil change following the maintenance schedule. Always disconnect power before any repair‚ and consult diagrams for proper component placement.

Replacing Air Filter
A clean air filter ensures efficient compressor operation. Locate the filter housing‚ usually near the pump intake. Remove the old filter‚ noting its orientation. Clean the housing‚ then install a new filter‚ ensuring a proper seal. Regularly check and replace the filter to maintain optimal airflow and prevent damage to internal components.
Belt Replacement Guide
A worn belt reduces compressor efficiency. First‚ disconnect the power! Locate the belt guard and remove it for access. Note the belt’s routing around the pulleys before removal. Install the new belt‚ ensuring proper tension and alignment. Reattach the guard securely. Regularly inspect the belt for cracks or wear‚ replacing as needed for peak performance.
Pump Oil Change Instructions (if applicable)
For oil-lubricated compressors‚ regular oil changes are crucial. Warm the compressor briefly‚ then disconnect power. Locate the oil drain plug and carefully drain the old oil into a suitable container. Replace the drain plug and refill with the manufacturer’s recommended oil type and quantity. Check the oil level with the dipstick‚ avoiding overfilling.
Parts Diagrams & Replacement
Locating detailed parts diagrams is essential for repairs. Many diagrams are available online through Sears’ website or dedicated parts retailers. Utilize your compressor’s model number (e.g.‚ 919;176850) when searching. Replacement parts can be sourced from Sears‚ online marketplaces‚ or local hardware stores. Ensure compatibility before ordering!

Locating Parts Diagrams Online
Accessing parts diagrams online is straightforward. Begin by visiting the official Sears website and navigating to the parts lookup section. Enter your specific model number‚ such as 919.176850‚ to filter results. Several third-party websites also host diagrams; however‚ verify their accuracy. Download and save diagrams for future reference during maintenance or repairs.
Sourcing Replacement Parts
Finding replacement parts for your Craftsman compressor is generally easy. Sears PartsDirect is a primary source‚ utilizing your model number (e.g.‚ 919.176850) for accurate matches. Alternatively‚ explore online retailers specializing in air compressor components. Ensure compatibility before purchasing‚ and consider local hardware stores for common items like filters and hoses.
Understanding Compressor Specifications
Craftsman compressors vary in specifications‚ crucial for tool compatibility and electrical safety. Key factors include voltage (typically 120V) and amperage draw‚ influencing circuit requirements. Tank capacity‚ ranging from 6 to 80 gallons‚ dictates air reserve. PSI ratings (125-175 PSI) determine maximum pressure. Always verify these specs before operation.
Voltage & Amperage Requirements
Most Craftsman air compressors operate on standard 120-volt household current. However‚ amperage requirements vary significantly based on compressor size and horsepower. Check the nameplate for specific amperage draw to avoid overloading circuits. Using the incorrect voltage can damage the motor‚ while exceeding amperage limits risks tripping breakers or causing fires.
Tank Capacity & PSI Ratings
Craftsman air compressors offer diverse tank capacities‚ ranging from compact 6-gallon portable units to larger 80-gallon stationary models. PSI (pounds per square inch) indicates maximum pressure. Common ratings are 125 PSI and 150 PSI‚ influencing tool performance. Larger tanks provide longer runtime‚ while higher PSI suits demanding applications. Always adhere to the compressor’s maximum PSI.
Air Compressor Accessories
Enhance your Craftsman compressor’s functionality with essential accessories. Air hoses and fittings are crucial for connecting tools‚ ensuring secure‚ leak-free operation. Compatibility with air tools – nailers‚ impact wrenches‚ spray guns – depends on CFM (cubic feet per minute) requirements. Consider quick-connect fittings for easy tool changes and air filters/regulators for clean‚ consistent airflow.
Air Hoses & Fittings
Selecting the right air hose is vital. Consider length‚ diameter (typically ¼ inch)‚ and material (rubber or PVC). Fittings‚ including quick connects and couplers‚ ensure secure connections to your compressor and tools. Check for burst pressure ratings exceeding your compressor’s maximum PSI. Regularly inspect hoses for cracks or wear‚ replacing them promptly for safety and optimal performance.
Air Tools Compatibility
Craftsman compressors power a wide range of pneumatic tools. Ensure your compressor’s CFM (cubic feet per minute) at the required PSI meets or exceeds the tool’s specifications. Commonly used tools include impact wrenches‚ ratchets‚ spray guns‚ and nailers. Using an undersized compressor will result in reduced tool performance. Always consult tool manuals for specific air requirements before operation.
Warranty Information
Craftsman air compressors are backed by a manufacturer’s warranty‚ protecting against defects in materials and workmanship. Warranty duration varies by model; registration is crucial for validation. Keep your purchase receipt as proof of date. Warranty coverage typically excludes damage from misuse‚ neglect‚ or unauthorized repairs. Visit the Craftsman website to register your compressor and review complete warranty details.
Registering Your Craftsman Compressor
Registering your Craftsman air compressor online is a simple process‚ typically done through the official Craftsman website. You’ll need your model number (e.g.‚ 919.176850) and purchase date. Registration confirms your ownership and activates warranty coverage. It also allows Craftsman to notify you of important updates‚ recalls‚ or promotional offers related to your specific compressor model.
Understanding Warranty Coverage
Craftsman compressor warranties vary by model‚ but generally cover defects in materials and workmanship for a specified period. Carefully review your warranty documentation for details regarding coverage length and exclusions. Typically‚ the warranty doesn’t cover damage from misuse‚ neglect‚ or normal wear and tear. Proper registration (using model 919.176850 as reference) is crucial to validate your warranty claims.
Portable vs. Stationary Compressors
Craftsman offers both portable and stationary air compressors‚ each suited for different needs; Portable models‚ like the 6 Gal. 150 PSI kit (model 919.176850)‚ prioritize mobility for various tasks. Stationary compressors provide larger tank capacities and continuous operation‚ ideal for demanding applications. Consider your workspace and project requirements when selecting the appropriate compressor type for optimal performance.
Advantages of Portable Models
Craftsman portable air compressors‚ such as the 6 Gal. 150 PSI unit (919.176850)‚ excel in versatility and convenience. Their compact size and lighter weight facilitate easy transport to different job sites. Ideal for DIY projects‚ inflation‚ and light-duty tasks‚ they require minimal storage space. Portability ensures accessibility where stationary units cannot reach.
Benefits of Stationary Compressors
Larger‚ stationary Craftsman compressors‚ like the 80 Gal. 175 PSI vertical model‚ offer substantial advantages for demanding applications; They provide a consistent and powerful air supply for continuous use with multiple air tools simultaneously. Higher tank capacity minimizes compressor runtime‚ boosting productivity. Stationary designs are generally quieter and more durable for professional settings.
Oil-Free vs. Oil-Lubricated Compressors
Craftsman offers both oil-free and oil-lubricated compressors. Oil-free models‚ like some smaller units‚ require less maintenance‚ eliminating oil changes and reducing mess. Oil-lubricated compressors‚ however‚ generally run cooler and quieter‚ offering increased durability and a longer lifespan. Choosing depends on usage; infrequent‚ light tasks suit oil-free‚ while heavy-duty applications benefit from oil lubrication.
Oil-Free Compressor Maintenance
Maintaining an oil-free Craftsman compressor is relatively simple. Regularly drain the tank after each use to prevent rust. Clean or replace the air filter frequently‚ ensuring optimal airflow. Inspect the intake filter for debris. Periodically check for air leaks around fittings and connections. Avoid using harsh chemicals for cleaning; mild soap and water are sufficient.
Oil-Lubricated Compressor Maintenance
Oil-lubricated Craftsman compressors require more diligent upkeep. Regularly check the oil level and change it according to the manufacturer’s schedule – typically every 300 hours. Drain the tank daily to prevent corrosion. Inspect and clean the air filter frequently. Listen for unusual noises indicating potential pump issues. Ensure proper ventilation during operation to dissipate heat.
Air Compressor Safety Features
Craftsman air compressors incorporate vital safety mechanisms. The pressure relief valve automatically releases excess pressure‚ preventing tank rupture. Thermal overload protection shuts down the motor if it overheats‚ averting damage. Always ensure the safety valve functions correctly. Never disable or bypass these features. Regular inspection of these components is crucial for safe operation and longevity.
Pressure Relief Valve Function
The pressure relief valve is a critical safety component. It automatically releases air when the compressor exceeds its maximum PSI‚ preventing dangerous tank over-pressurization. Regularly test the valve by gently lifting it – a brief burst of air confirms functionality. Never tamper with or obstruct this valve; it’s your primary defense against potential explosions. A faulty valve must be replaced immediately.
Thermal Overload Protection
Craftsman compressors feature thermal overload protection (OLP) for motor safety. If the motor overheats due to excessive use or blockage‚ the OLP switch trips‚ halting operation. Allow the motor to cool completely – typically 30-60 minutes – before attempting restart. Repeated tripping indicates a potential issue like restricted airflow or a failing motor‚ requiring professional attention. Never bypass or disable the OLP.